

Poly Sway Bar Bushing Install
This was not an easy install. Looks simple enough but required a lot of removing things that are in the way.
My issue what that I was getting noise from the suspension when going fast/hard over uneven paved street. Worst when I'm on a dirt road. Looking at the sway bar bushings they looked blown out. I thought it might be from the offroading I do or the Daystar lift kit or a combination of both. After I removed the sway bar and got a closer look, the bushings were just fine visually. When I unbolted the sway bar end link that connects to the front struts and zip tied them away from all the other moving parts, the noise went away. Still leading me to believe the issue is with the sway bar. And since a closer inspection of the bushings didn't show any damage at all, I can only guess that the bushings are worn out in a way that the bushings are too soft and this allows the sway bar to bounce around and hit the bushing brackets. The bushings feel strong, but under pressure they might flex easier??? I don't know. Since I spent sooo much time taking it off to find out the bushings looked fine and I already bought some polyurethane bushing, I might as well install the new bushings. All I know is that the noise went away when I unbolted the sway bar and when I have the new bushings on.
![Image]()
The other issue I had was a broken sway bar end link that came with the Daystar lift kit. It broke at the ball joint. I'm guessing it's from the bad bushing/noise issue that cause extra stress on it. I contacted Daystar and got a free warranty replacement for it. I also asked if they offered any sway bar bushing or plan to make any. No work on making, but I gave the Daystar contact the sizing of the stock bushing and he was able to point me towards something close that they offer.
Sway bar bushings I used: Daystar KJ05001BK 76-86 CJ5 CJ7 15/16 Sway bar bushing kit. It comes with other things that I did not use. I just used the bushings. I had to modify the bushing to make them fit as well. The Daystar contact said that these where 24mm bushing that were 1.7" wide. I had issues with the 24mm sizing and I estimated a wider measurement. The 1.7" actually fit fine. 24mm was a bit small, but that was what I measure with my measuring calipers. 25mm or 26mm might fit better than the 24mm I used.
![Image]()
![Image]()
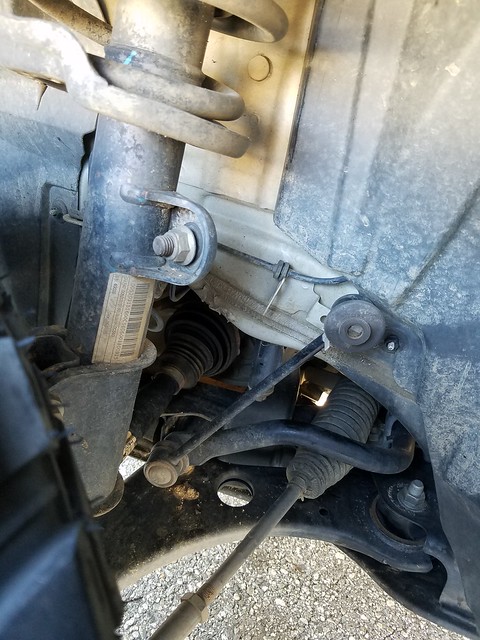
I don't have pictures of everything I did, but I give you guys a quick run down. It looks like you can just unbolt the sway bar bushings and pop them off. Wrong. The bushings come off by unbolting the 4 torx bolts under the car. The nuts on the top side of the bushings are welded and don't require any tools. Just unbolt the 4 bolts under them. I tried prying the bushings off, but no go. I couldn't see or feel anything that way holding them on. So I figured I'll just pull the entire sway bar off to get a better look.
I pulled the sway bar out from the passenger side. So removing the strut is a must. This gives me more room to maneuver the sway bar to get it out. Remove the steering control arm. The abs wire from the strut. The brake line from the strut. The 2 lower bolts on the strut/hub. Then the 3 bolts on top of the strut. Remove the strut.
To get enough room to remove the sway bar, there was 2 ways I saw. Remove the complete sub frame or just partially remove it. I didn't want to completely remove it because I didn't know what else is attached to it. Motor mounts, tranny mounts, etc. Then you have to worry about lining it back up and even getting the heavy sub frame back into position. I did everything myself. So it would be easier if you had some help or 2 jacks. The other thing you have to worry about is the steering wheel. If you drop the sub frame with the steering rack attached to it, the steering staff will pull out and the steering wheel will free spin. This will miss with the steering wheel sitting straight when you reinstall the steering rack/sub frame.
So to the option I chose. I loosened the sub frame and left the 4 front bolts on but fully loosen. First locate the 2 exhaust hangers that bolt onto the sub frame. Each hanger has 2 bolts. Remove the bolts completely. If you don't the sub frame will hang on these.
Now locate each sub frame bolts. There are 4 large ones towards the rear of the sub frame. 2 on each side. Then there are 2 behind the strut that bolts into the frame. 1 on each side. Then there are 4 bolts towards the front of the sub frame. 2 on each side right next to each other. These bolt onto a round tube. Note that these didn't bolt down tight for me. Tightening them seemed to just compress the round tube. So there are 10 bolts total that hold the sub frame to the car. Unbolt each bolt 1 at a time and re-install them with 3-4 threads. Once all of them are loose, leave the 4 front ones that bolt onto the round tube on and completely remove the 2 middle bolts and the 4 rear bolts. This will let the rear of the sub frame hang down and give you room to remove the sway bar. This will also keep the steering shaft connected to the steering rack.
The last thing to get out of the way is the exhaust. I used the jack to jack up the exhaust at the cat/resonator??? The big canister right behind the sub frame. So with the sub frame down and the exhaust up, this gave me just enough room to get the sway bar out. PITA... I still had my brother to use a pry bar to pry the sub frame down on the driver side. I pried at the middle bolt between the sub frame and chassis frame. Then maneuver the sway bar out from the passenger side. Still a real pain because the bushing and sway bar likes to hook up on everything. Just keep at it and use somebody on the other side to help watch and guide the sway bar out of the way. Getting it back in is a lot easy with no bushings / bushing mounts.
Okay, here comes the detailed parts. This is when I was able to inspect the bushing better and noticed they weren't blown. But I had to try and get the new poly bushings in. And to see if this would eliminate the noise. First I had to get the bushings off. This is when I found out the bushings are riveted on. The top and bottom pieces and riveted at the nuts. So that means, if you want to ever replace just the bushings from Jeep, you would have to replace the sway bar completely. Such a stupid advancement in building cars.
![Image]()
I spray painted the oem bushings with bright paint to mark where the new bushings should sit. But this wasn't necessary.
![Image]()
I used a Dremel to cut out the rivet.
![Image]()
![Image]()
![Image]()
Here are a bunch of pictures of the comparison of both unmodified bushings. The poly bushings are very close to the oem rubber bushings. It should be fine though since the rubber bushings are compressed by the bushings and the poly bushing don't compress much. I didn't clean or flatten the rivet after I cut them apart either. I left them as the lip on them will guide the top bracket onto the bottom bracket.
![Image]()
![Image]()
![Image]()
![Image]()
![Image]()
![Image]()
![Image]()
![Image]()
This was not an easy install. Looks simple enough but required a lot of removing things that are in the way.
My issue what that I was getting noise from the suspension when going fast/hard over uneven paved street. Worst when I'm on a dirt road. Looking at the sway bar bushings they looked blown out. I thought it might be from the offroading I do or the Daystar lift kit or a combination of both. After I removed the sway bar and got a closer look, the bushings were just fine visually. When I unbolted the sway bar end link that connects to the front struts and zip tied them away from all the other moving parts, the noise went away. Still leading me to believe the issue is with the sway bar. And since a closer inspection of the bushings didn't show any damage at all, I can only guess that the bushings are worn out in a way that the bushings are too soft and this allows the sway bar to bounce around and hit the bushing brackets. The bushings feel strong, but under pressure they might flex easier??? I don't know. Since I spent sooo much time taking it off to find out the bushings looked fine and I already bought some polyurethane bushing, I might as well install the new bushings. All I know is that the noise went away when I unbolted the sway bar and when I have the new bushings on.
The other issue I had was a broken sway bar end link that came with the Daystar lift kit. It broke at the ball joint. I'm guessing it's from the bad bushing/noise issue that cause extra stress on it. I contacted Daystar and got a free warranty replacement for it. I also asked if they offered any sway bar bushing or plan to make any. No work on making, but I gave the Daystar contact the sizing of the stock bushing and he was able to point me towards something close that they offer.
Sway bar bushings I used: Daystar KJ05001BK 76-86 CJ5 CJ7 15/16 Sway bar bushing kit. It comes with other things that I did not use. I just used the bushings. I had to modify the bushing to make them fit as well. The Daystar contact said that these where 24mm bushing that were 1.7" wide. I had issues with the 24mm sizing and I estimated a wider measurement. The 1.7" actually fit fine. 24mm was a bit small, but that was what I measure with my measuring calipers. 25mm or 26mm might fit better than the 24mm I used.


I don't have pictures of everything I did, but I give you guys a quick run down. It looks like you can just unbolt the sway bar bushings and pop them off. Wrong. The bushings come off by unbolting the 4 torx bolts under the car. The nuts on the top side of the bushings are welded and don't require any tools. Just unbolt the 4 bolts under them. I tried prying the bushings off, but no go. I couldn't see or feel anything that way holding them on. So I figured I'll just pull the entire sway bar off to get a better look.
I pulled the sway bar out from the passenger side. So removing the strut is a must. This gives me more room to maneuver the sway bar to get it out. Remove the steering control arm. The abs wire from the strut. The brake line from the strut. The 2 lower bolts on the strut/hub. Then the 3 bolts on top of the strut. Remove the strut.
To get enough room to remove the sway bar, there was 2 ways I saw. Remove the complete sub frame or just partially remove it. I didn't want to completely remove it because I didn't know what else is attached to it. Motor mounts, tranny mounts, etc. Then you have to worry about lining it back up and even getting the heavy sub frame back into position. I did everything myself. So it would be easier if you had some help or 2 jacks. The other thing you have to worry about is the steering wheel. If you drop the sub frame with the steering rack attached to it, the steering staff will pull out and the steering wheel will free spin. This will miss with the steering wheel sitting straight when you reinstall the steering rack/sub frame.
So to the option I chose. I loosened the sub frame and left the 4 front bolts on but fully loosen. First locate the 2 exhaust hangers that bolt onto the sub frame. Each hanger has 2 bolts. Remove the bolts completely. If you don't the sub frame will hang on these.
Now locate each sub frame bolts. There are 4 large ones towards the rear of the sub frame. 2 on each side. Then there are 2 behind the strut that bolts into the frame. 1 on each side. Then there are 4 bolts towards the front of the sub frame. 2 on each side right next to each other. These bolt onto a round tube. Note that these didn't bolt down tight for me. Tightening them seemed to just compress the round tube. So there are 10 bolts total that hold the sub frame to the car. Unbolt each bolt 1 at a time and re-install them with 3-4 threads. Once all of them are loose, leave the 4 front ones that bolt onto the round tube on and completely remove the 2 middle bolts and the 4 rear bolts. This will let the rear of the sub frame hang down and give you room to remove the sway bar. This will also keep the steering shaft connected to the steering rack.
The last thing to get out of the way is the exhaust. I used the jack to jack up the exhaust at the cat/resonator??? The big canister right behind the sub frame. So with the sub frame down and the exhaust up, this gave me just enough room to get the sway bar out. PITA... I still had my brother to use a pry bar to pry the sub frame down on the driver side. I pried at the middle bolt between the sub frame and chassis frame. Then maneuver the sway bar out from the passenger side. Still a real pain because the bushing and sway bar likes to hook up on everything. Just keep at it and use somebody on the other side to help watch and guide the sway bar out of the way. Getting it back in is a lot easy with no bushings / bushing mounts.
Okay, here comes the detailed parts. This is when I was able to inspect the bushing better and noticed they weren't blown. But I had to try and get the new poly bushings in. And to see if this would eliminate the noise. First I had to get the bushings off. This is when I found out the bushings are riveted on. The top and bottom pieces and riveted at the nuts. So that means, if you want to ever replace just the bushings from Jeep, you would have to replace the sway bar completely. Such a stupid advancement in building cars.

I spray painted the oem bushings with bright paint to mark where the new bushings should sit. But this wasn't necessary.

I used a Dremel to cut out the rivet.


Here are a bunch of pictures of the comparison of both unmodified bushings. The poly bushings are very close to the oem rubber bushings. It should be fine though since the rubber bushings are compressed by the bushings and the poly bushing don't compress much. I didn't clean or flatten the rivet after I cut them apart either. I left them as the lip on them will guide the top bracket onto the bottom bracket.


